Remember that you can have this functionality from the Starter plan ;)
How to manage losses?
Here you will be able to register independently each of the losses produced by an event. Go to the events module and click on the "Losses" section.
%204.23.17%20p.%20m..png?width=670&height=382&name=Captura%20de%20Pantalla%202023-01-16%20a%20la(s)%204.23.17%20p.%20m..png)
How to add a loss?
On the upper right side you will find the "Create loss" button (you can add as many as you consider necessary), here you will have to enter the following fields:
- Posting date
- Posting time
- Amount
%204.24.17%20p.%20m..png?width=670&height=382&name=Captura%20de%20Pantalla%202023-01-16%20a%20la(s)%204.24.17%20p.%20m..png)
You can also optionally enter the following fields:
- Accounting account
- Description
%204.27.53%20p.%20m..png?width=670&height=382&name=Captura%20de%20Pantalla%202023-01-16%20a%20la(s)%204.27.53%20p.%20m..png)
After creating your loss click on the "Add" button and you will have the loss created.
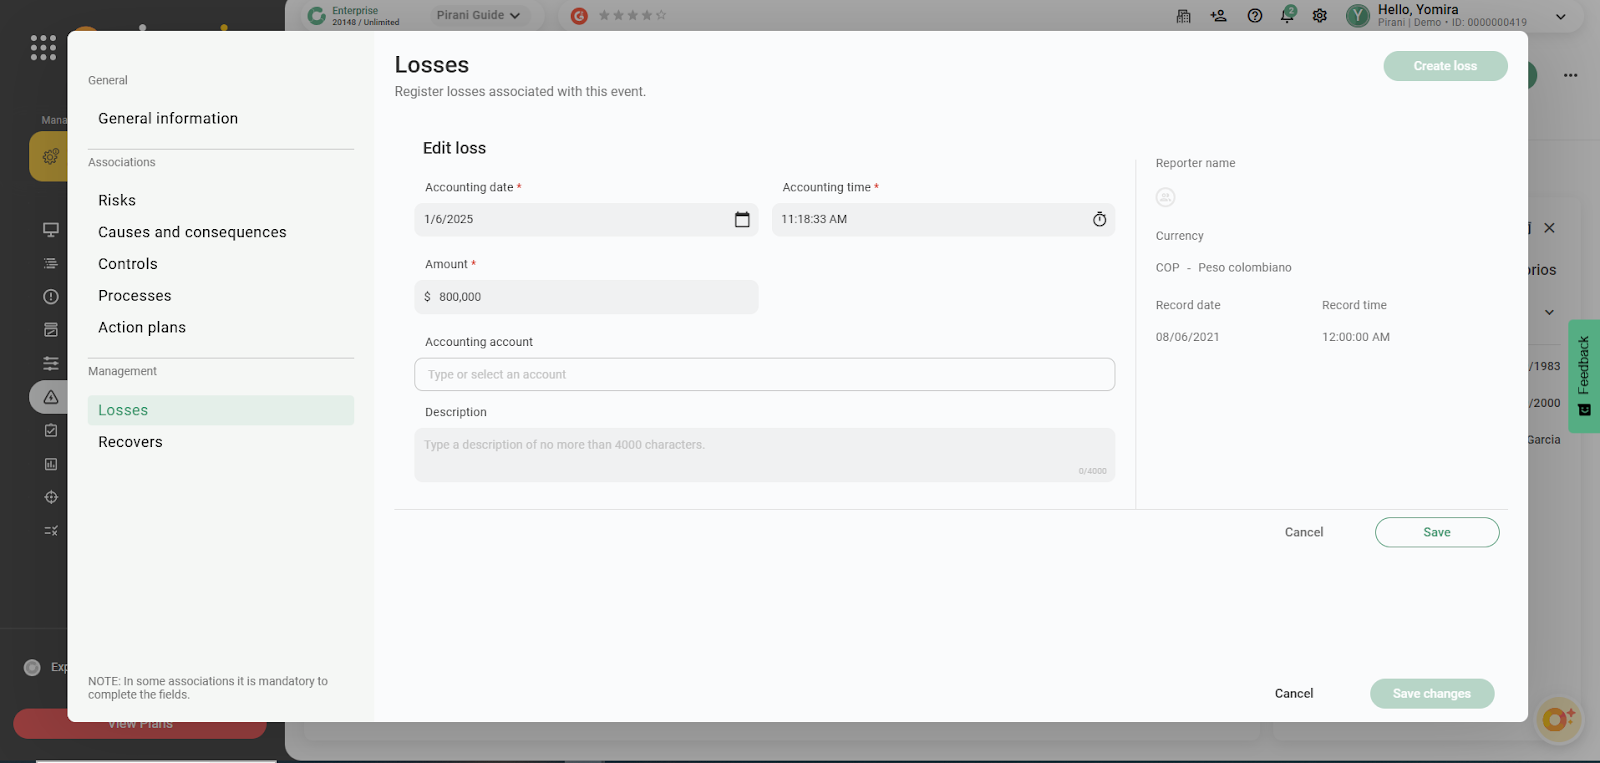
How to edit and delete a loss?
To edit just select the pencil icon and you will be able to make the changes you consider necessary.
%204.28.16%20p.%20m..png?width=670&height=382&name=Captura%20de%20Pantalla%202023-01-16%20a%20la(s)%204.28.16%20p.%20m..png)
To delete a loss click on the trash can icon, if you are sure you will no longer need that record click on delete and you are done.
%204.29.00%20p.%20m..png?width=670&height=382&name=Captura%20de%20Pantalla%202023-01-16%20a%20la(s)%204.29.00%20p.%20m..png)
👀 Important:
The tool will automatically record the name of the reporter, the currency (determined by the organization itself), the date and time of the record. This information cannot be edited.
How to manage recoveries?
Here you will be able to register those recoveries that the organization has after an event. Go to the events module and click on the "Create recovery" section (you can add as many as you consider necessary).
%204.30.07%20p.%20m..png?width=670&height=382&name=Captura%20de%20Pantalla%202023-01-16%20a%20la(s)%204.30.07%20p.%20m..png)
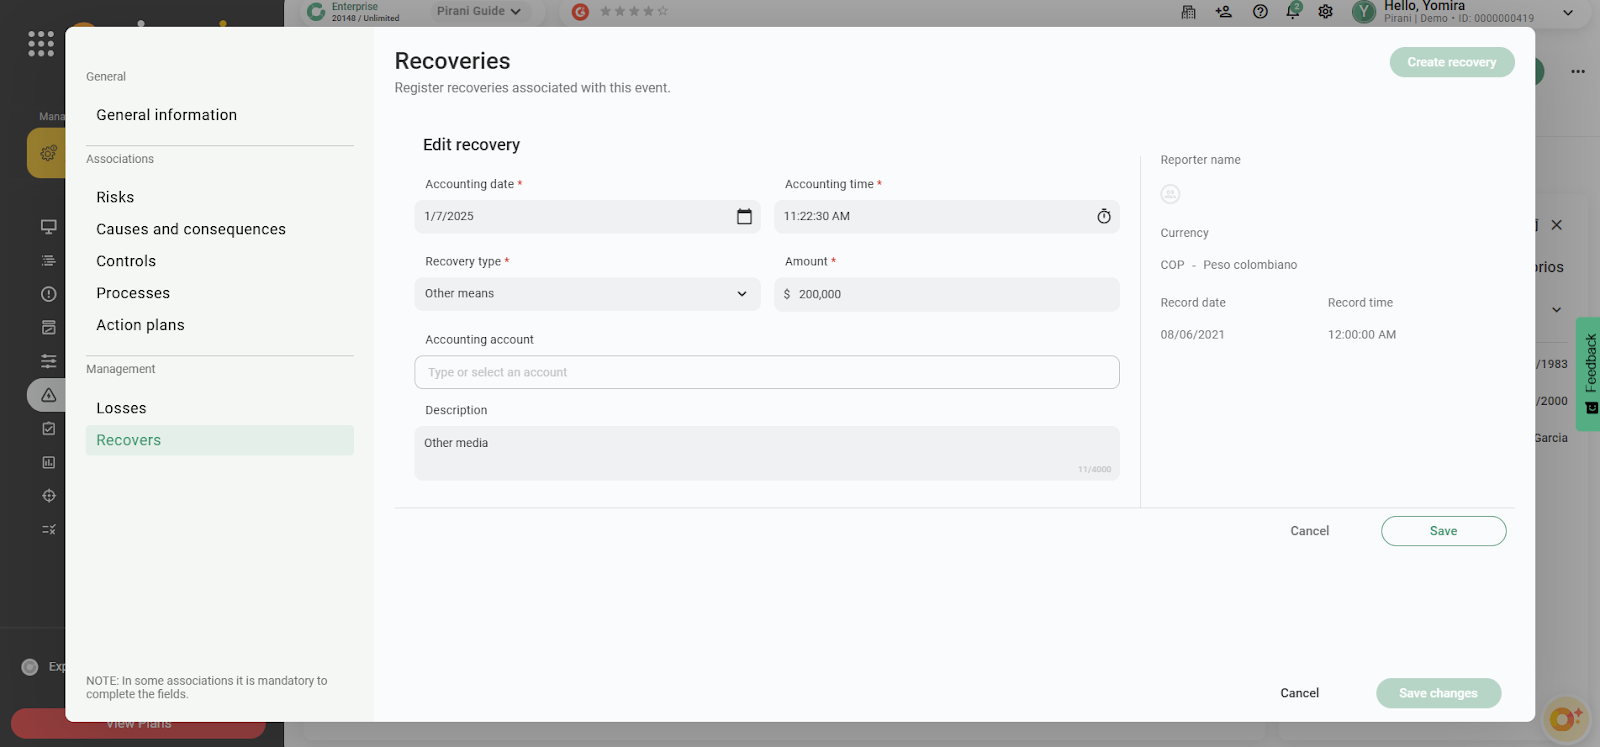
How to create recoveries?
Here you will have to enter the following fields:
- Recovery date
- Posting time
- Type of recovery
- Amount
%204.32.39%20p.%20m..png?width=670&height=382&name=Captura%20de%20Pantalla%202023-01-16%20a%20la(s)%204.32.39%20p.%20m..png)
You may also optionally enter the following fields:
- Accounting account
- Description
%204.35.21%20p.%20m..png?width=670&height=382&name=Captura%20de%20Pantalla%202023-01-16%20a%20la(s)%204.35.21%20p.%20m..png)
After creating your recovery click on the "Add" button and that's all ;)
How to edit and delete a loss?
The same as for the loss record, you will have to select the pencil icon and you will be able to make the changes you consider necessary.%204.37.16%20p.%20m..png?width=670&height=382&name=Captura%20de%20Pantalla%202023-01-16%20a%20la(s)%204.37.16%20p.%20m..png)
To delete a loss click on the trash can icon, if you are sure you will no longer need that record click on delete and that's it.
%204.36.23%20p.%20m..png?width=670&height=382&name=Captura%20de%20Pantalla%202023-01-16%20a%20la(s)%204.36.23%20p.%20m..png)
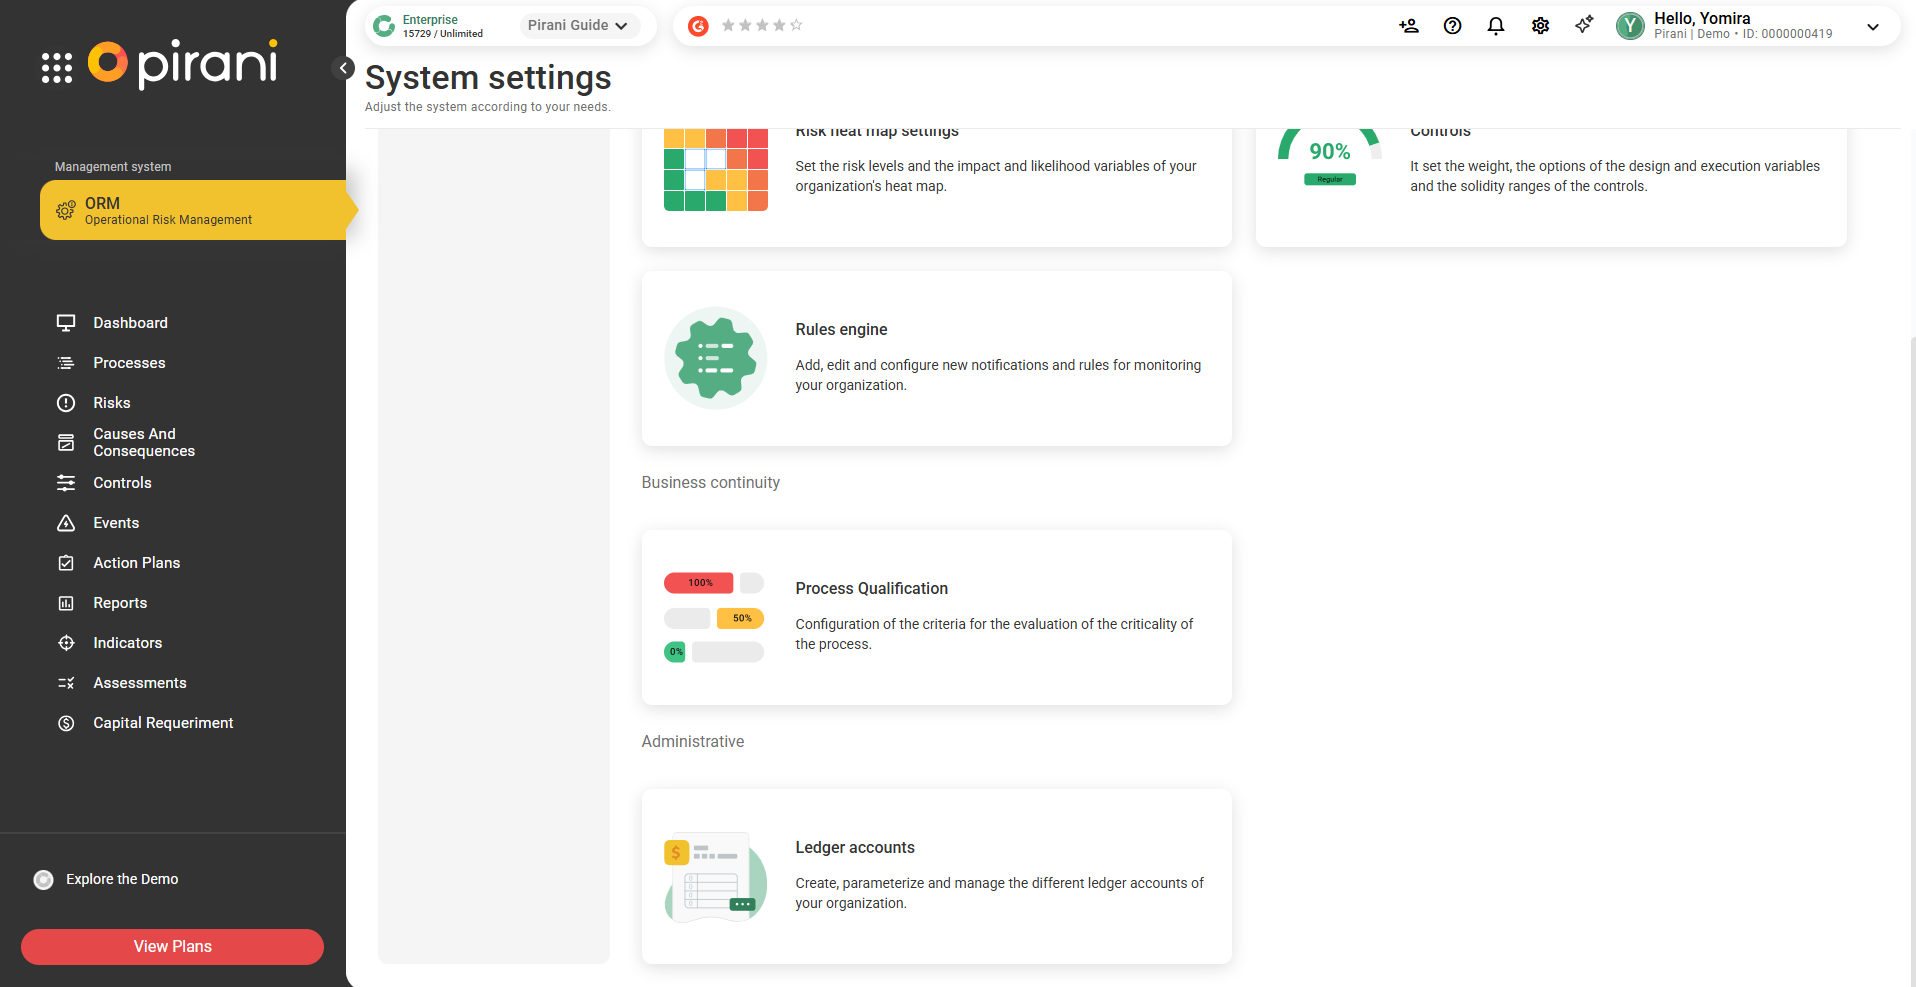
How to create accounting accounts?
Go to the settings icon at the top right of the tool (gear icon) and go to the "Accounting accounts" section. Here click on the "Create accounting account" button.
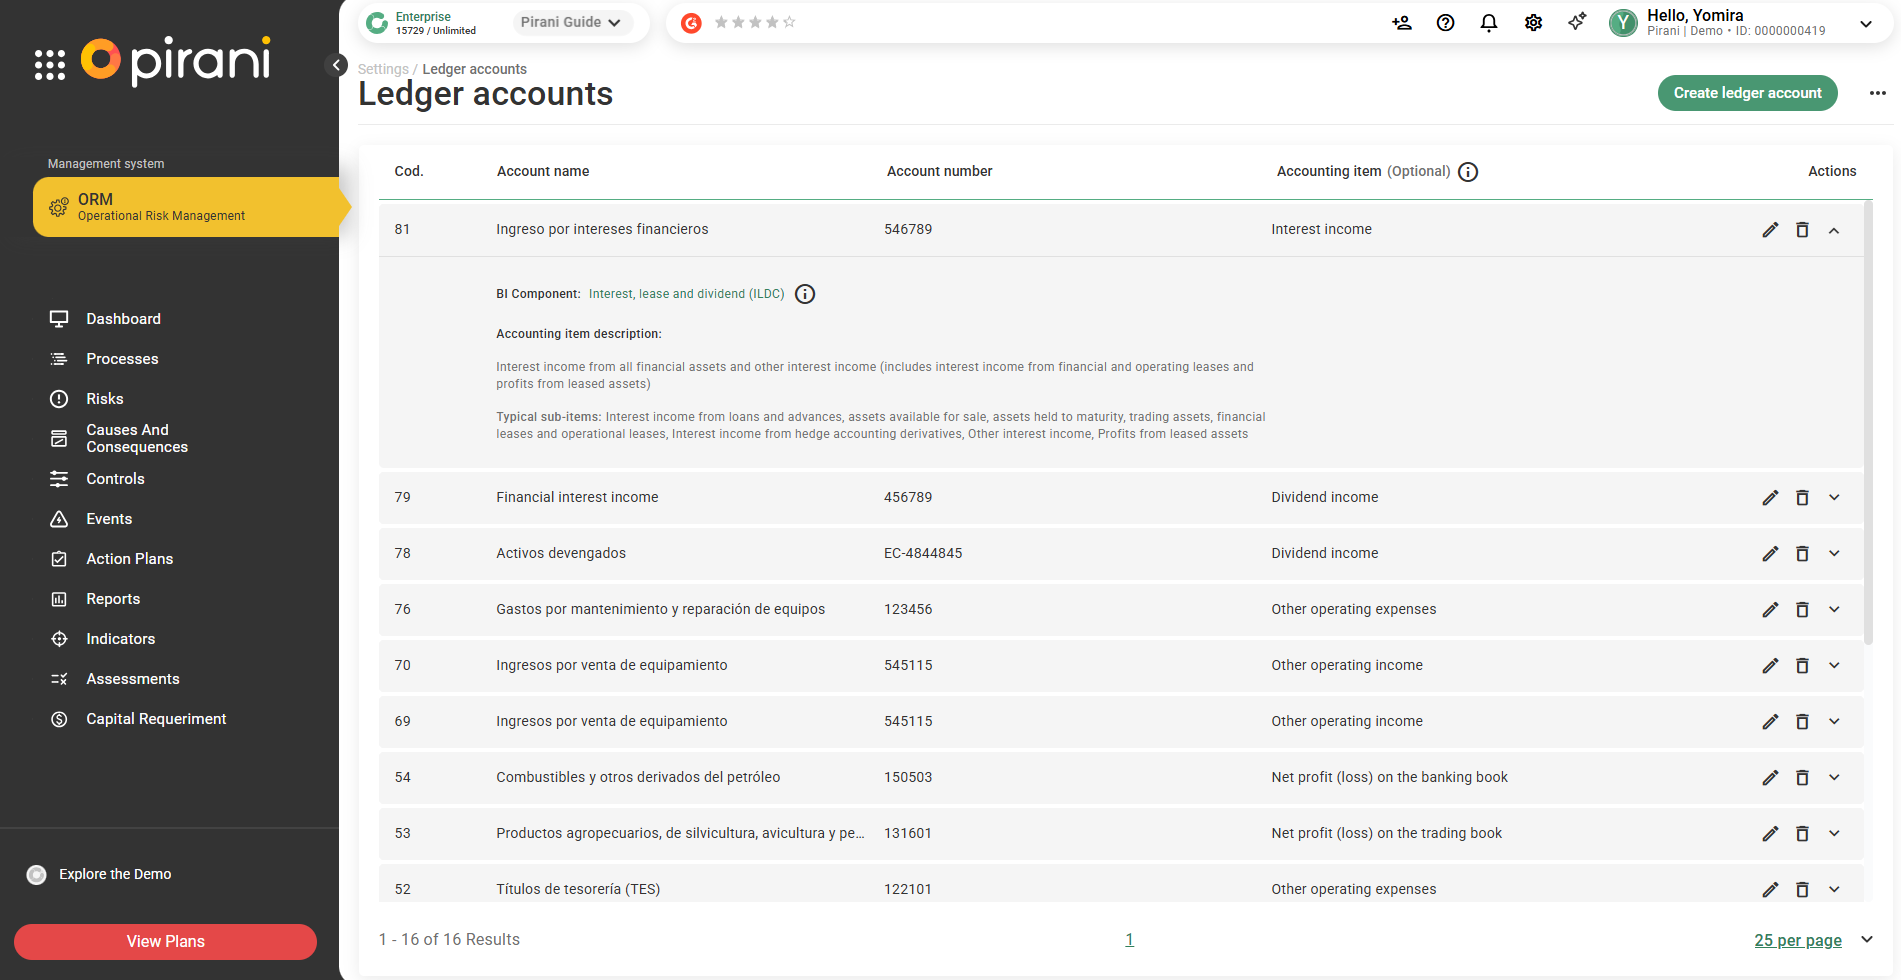
Complete the basic fields:
- Account Name: Enter the name of the accounting account.
- Account Number: Specify the unique account number.
- Select the "Accounting Item": In the "Accounting Item" field, several options will appear. Depending on the option you select, a brief description of what each item represents will be displayed. Each accounting item is associated with a specific component, which will determine the type of transactions and records applied to that account.
It is important to remember that each accounting item belongs to a different component, which affects the classification and accounting treatment of the account.
Depending on the option selected, the component information along with its description will be displayed.
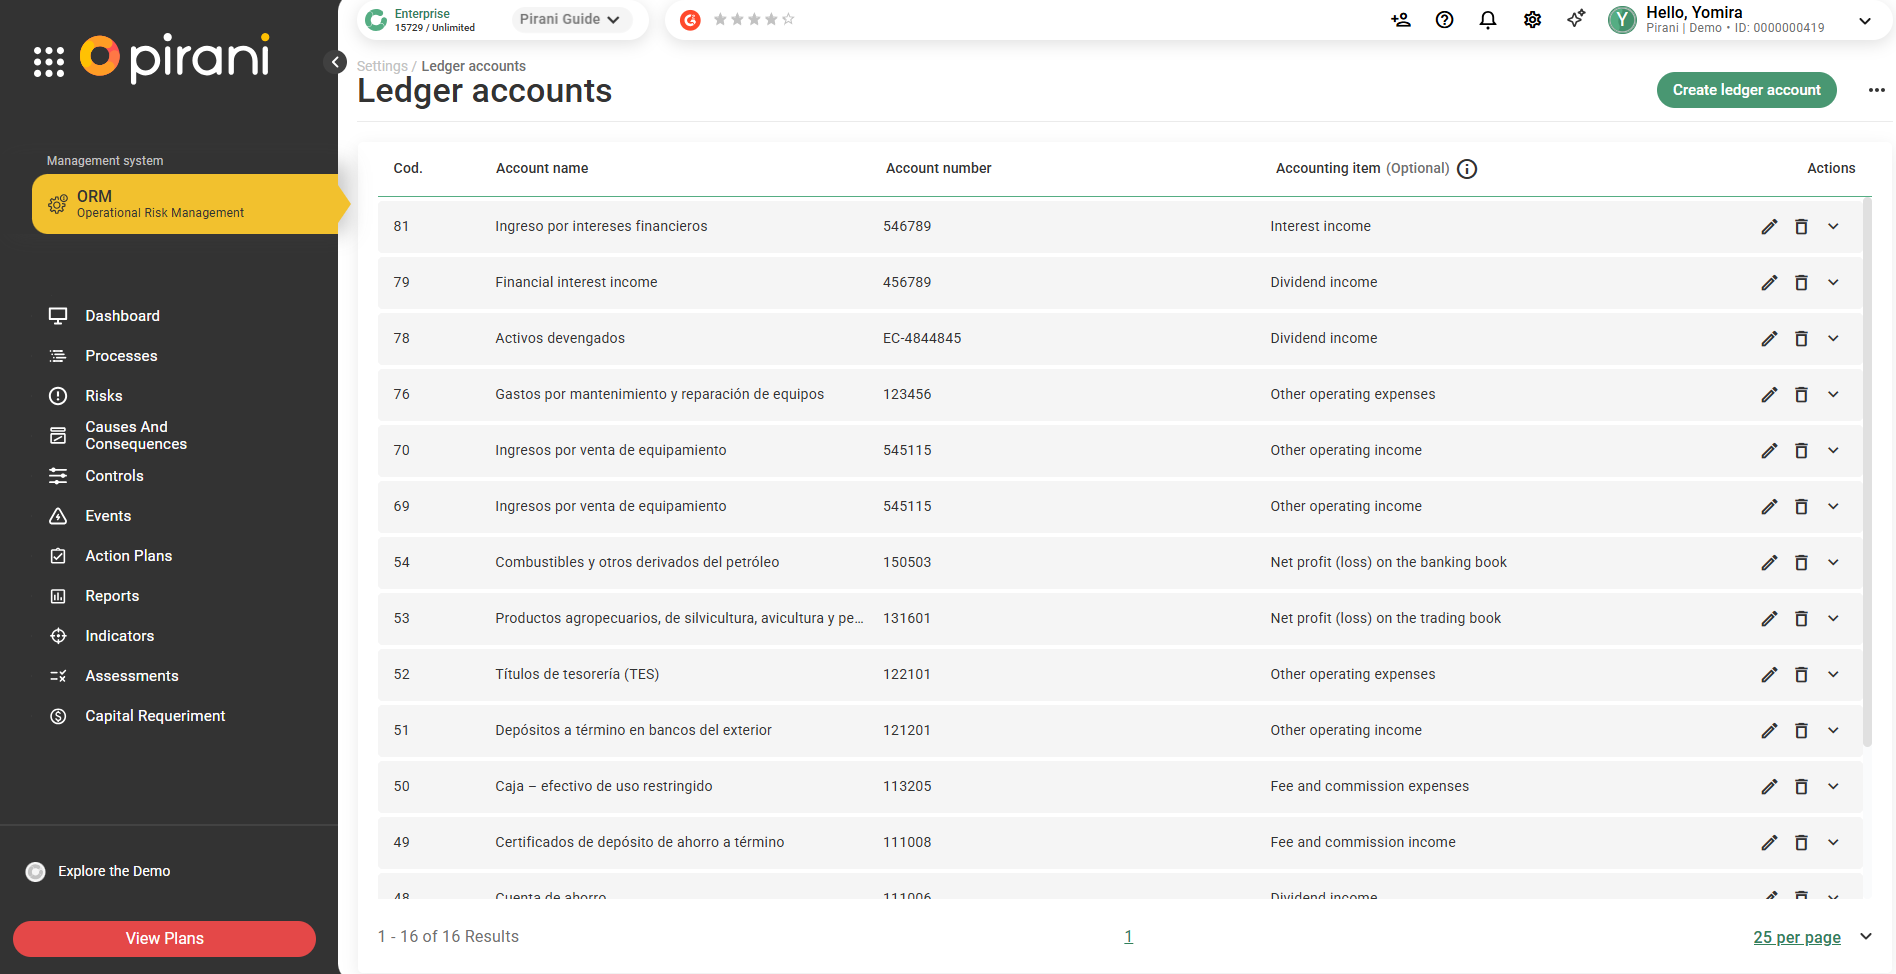
How to edit or delete an account?
To edit any account you only need to click on the pencil icon and in case you want to delete an account you only need to click on the trash can icon.
How to change the currency?
Inside "Organization" you will find the "Currencies" section, here you will be able to select the currency in which all the events of your organization will be registered. To finish click on "Save changes".
%204.58.08%20p.%20m..png?width=670&height=382&name=Captura%20de%20Pantalla%202023-01-16%20a%20la(s)%204.58.08%20p.%20m..png)
%204.57.27%20p.%20m..png?width=670&height=382&name=Captura%20de%20Pantalla%202023-01-16%20a%20la(s)%204.57.27%20p.%20m..png)
Remember: if in the future you wish to change the currency in the tool, the conversion will NOT be calculated in your previous records.
How does the bulk update of losses and recoveries work?
The bulk update of losses and recoveries is a key feature for keeping the event database within the risk management system up to date. By recording and updating losses and recoveries associated with incidents or events, organizations can improve traceability, accelerate analysis, and optimize their response strategy. Losses and recoveries are also linked to the Compliance and ISMS management systems.

How to perform a bulk update
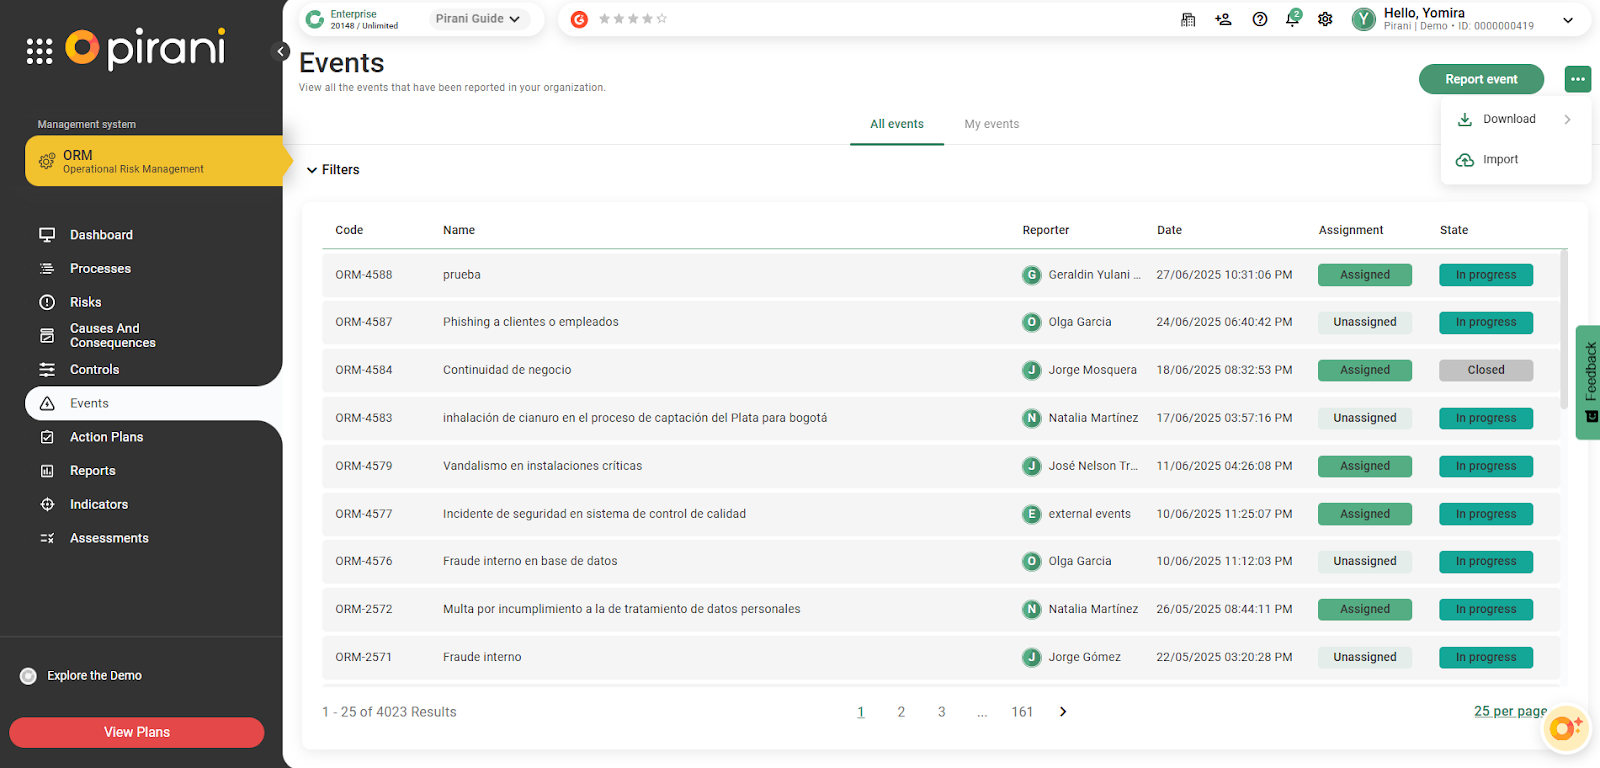
The bulk update functionality is located within the Events module, as losses and recoveries are associated with this entity.
From the “Events” module, click on the three-dot button (…), and select “Import”.
Select “New Import.”
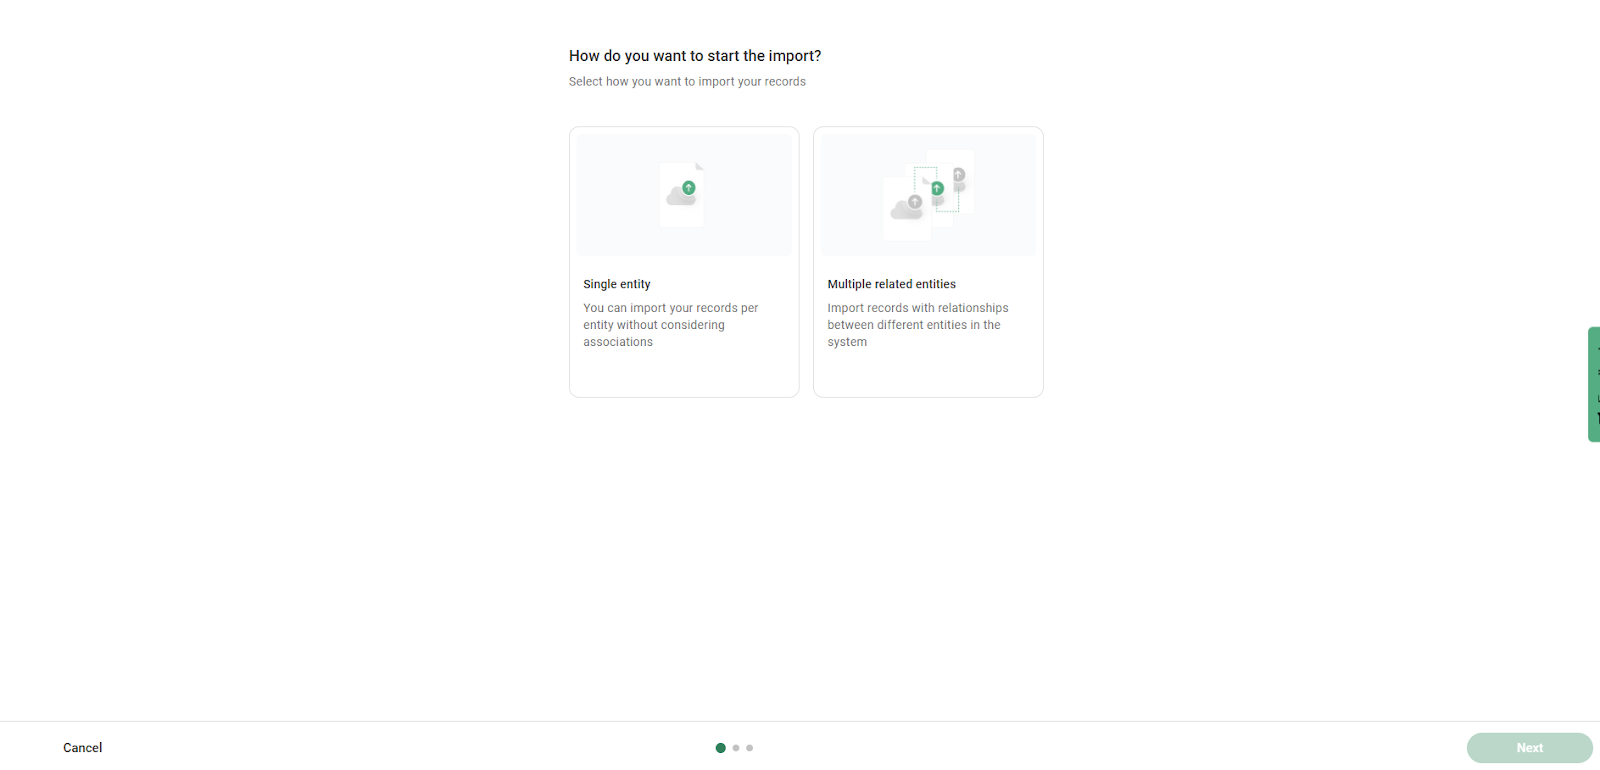
How do you want to start the import?
Select “Multiple related entities.” Once this option is selected, click “Next” to proceed with the process.
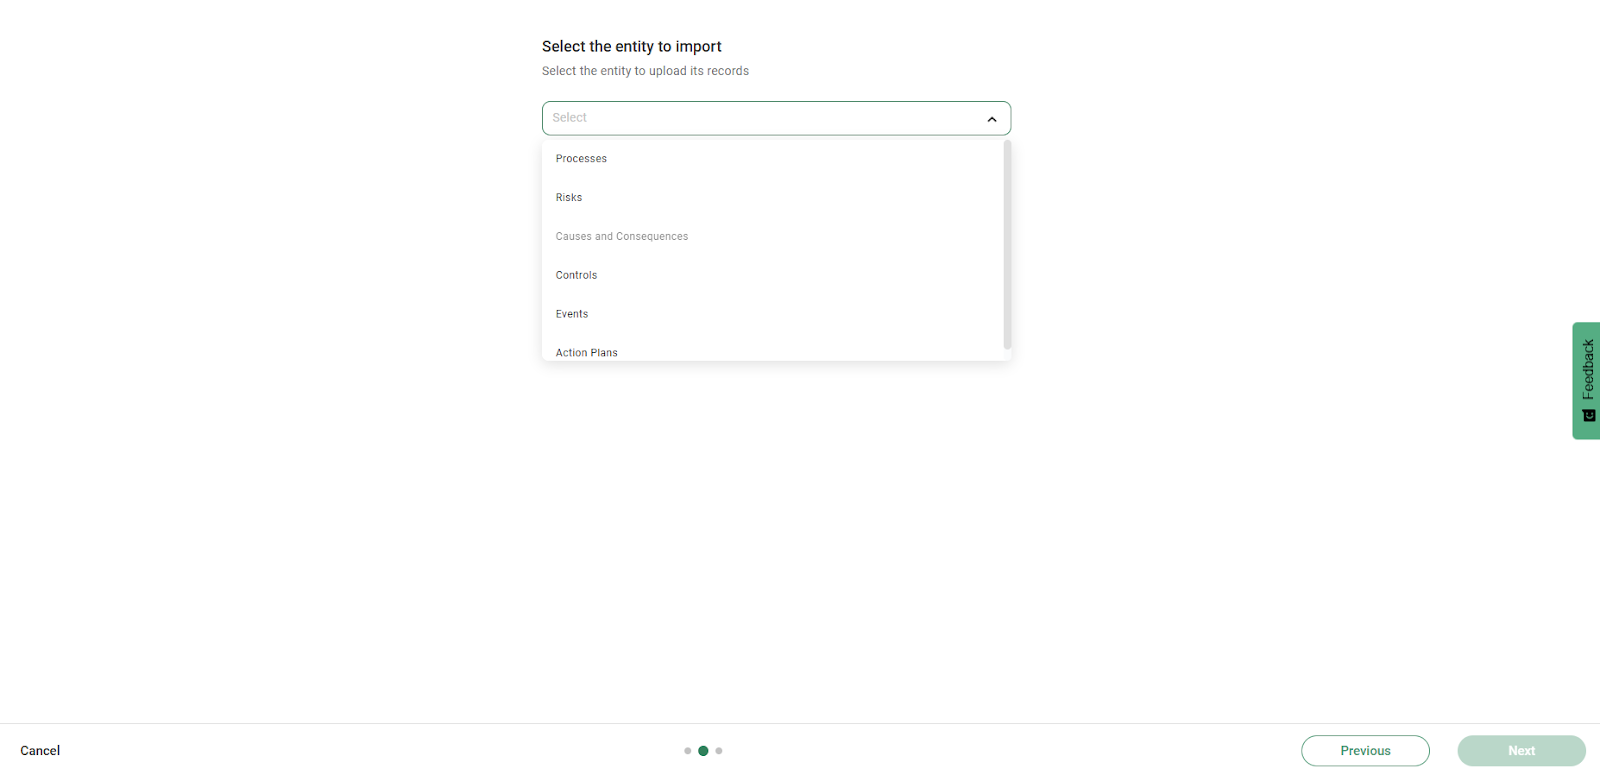
Once in the “Main Entity” section, select the “Events” module. This will ensure proper linkage with the losses and recoveries. After selecting the entity, click “Next.”
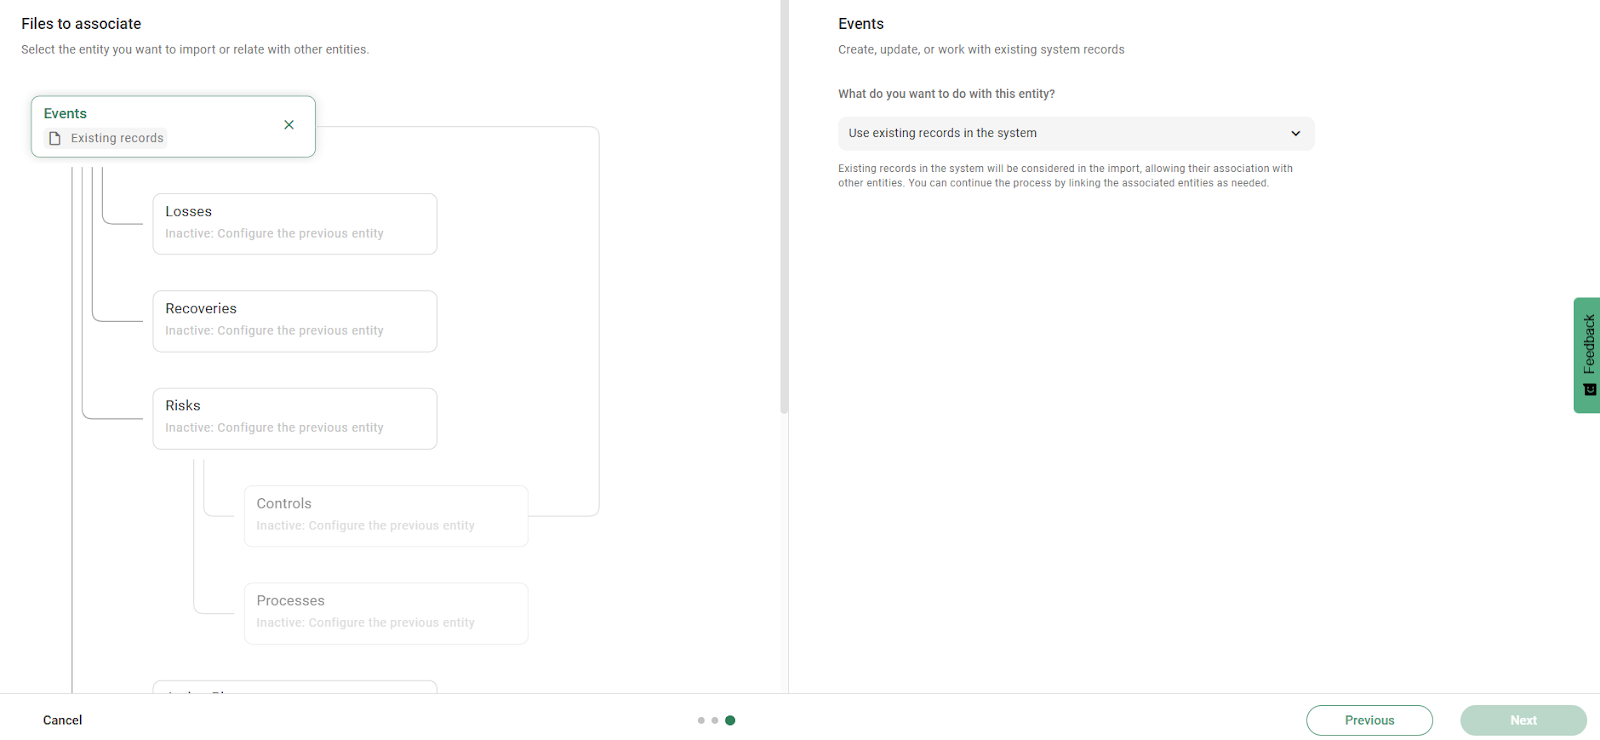
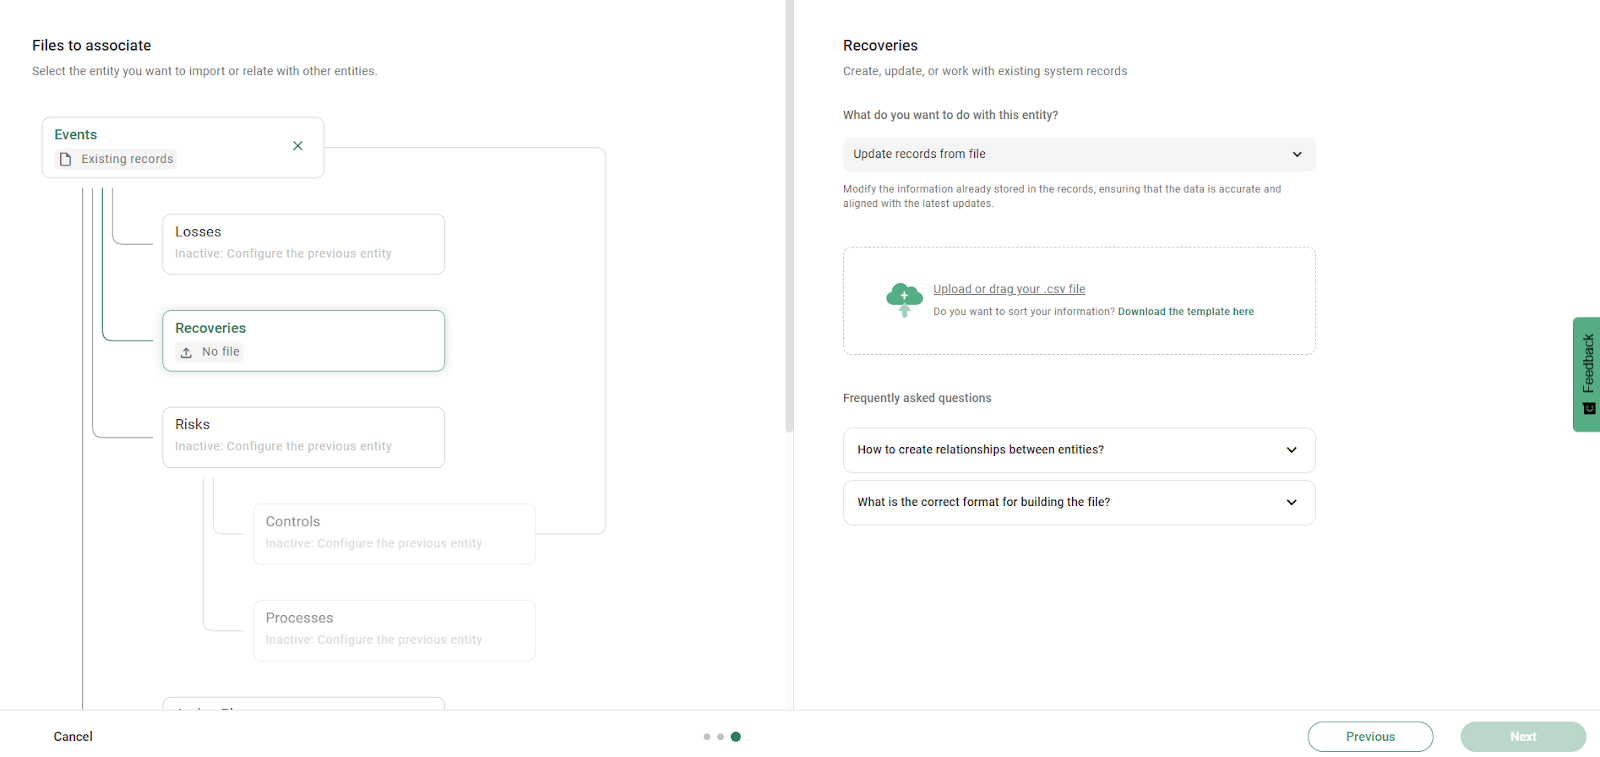
At this stage, you will see the data structure for the “Events” entity, where you can identify its link with “Losses and Recoveries.”
To continue, on the left side, make sure the “Events” entity is selected. On the right side, click on the dropdown labeled “What do you want to do with this entity?” and select the option “Use existing records in the system.”
This allows you to work with events already registered in Pirani, so that related entities can be associated or modified.
How do I update the losses?
To update the “Losses” associated with events, go to the dropdown on the right-hand side labeled “What do you want to do with this entity?” and select “Update records from file.”
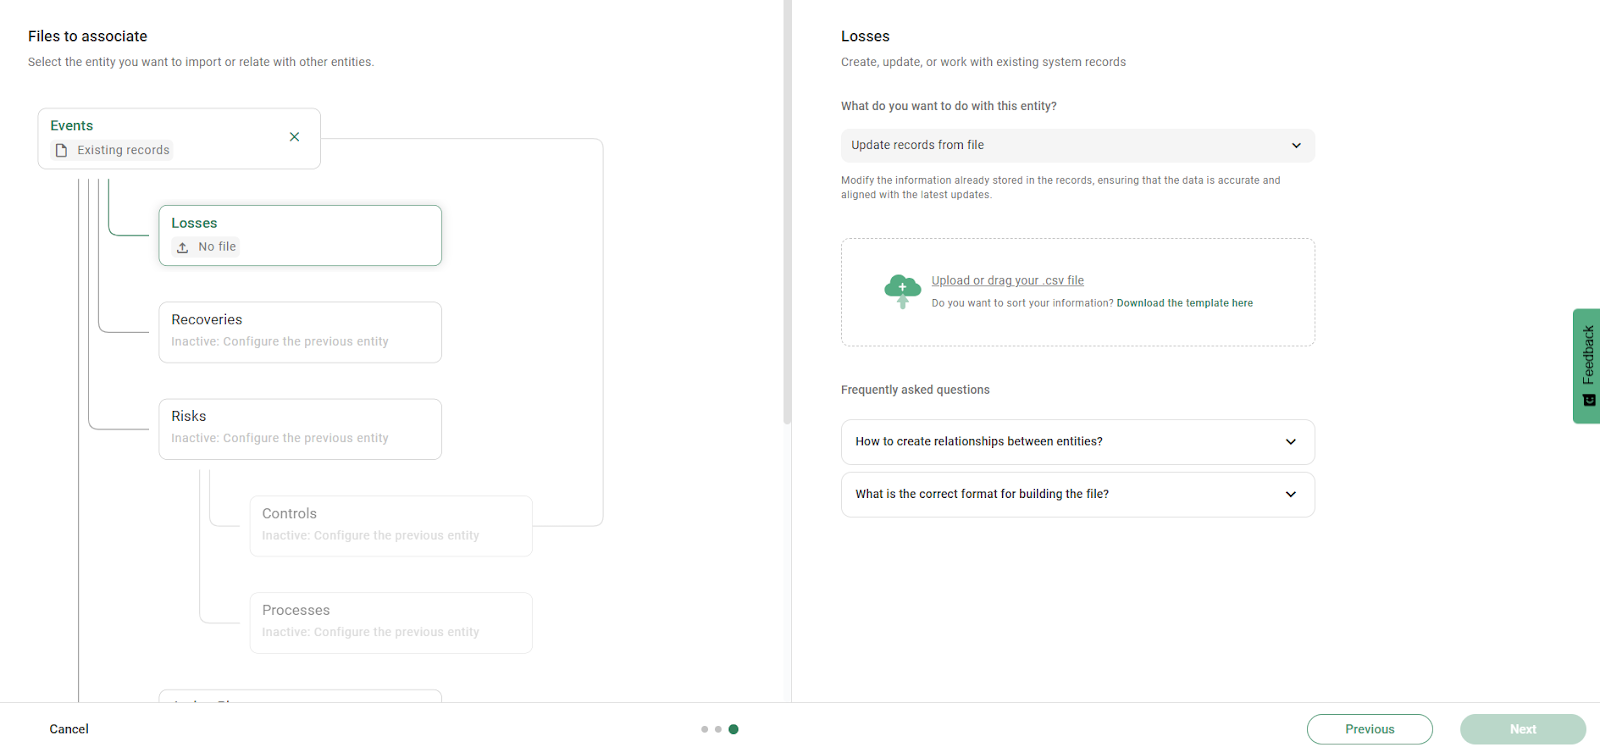
Once your file is properly structured according to best practices for data import—which you can review in our Help Center—you can upload the Excel file in .csv format.
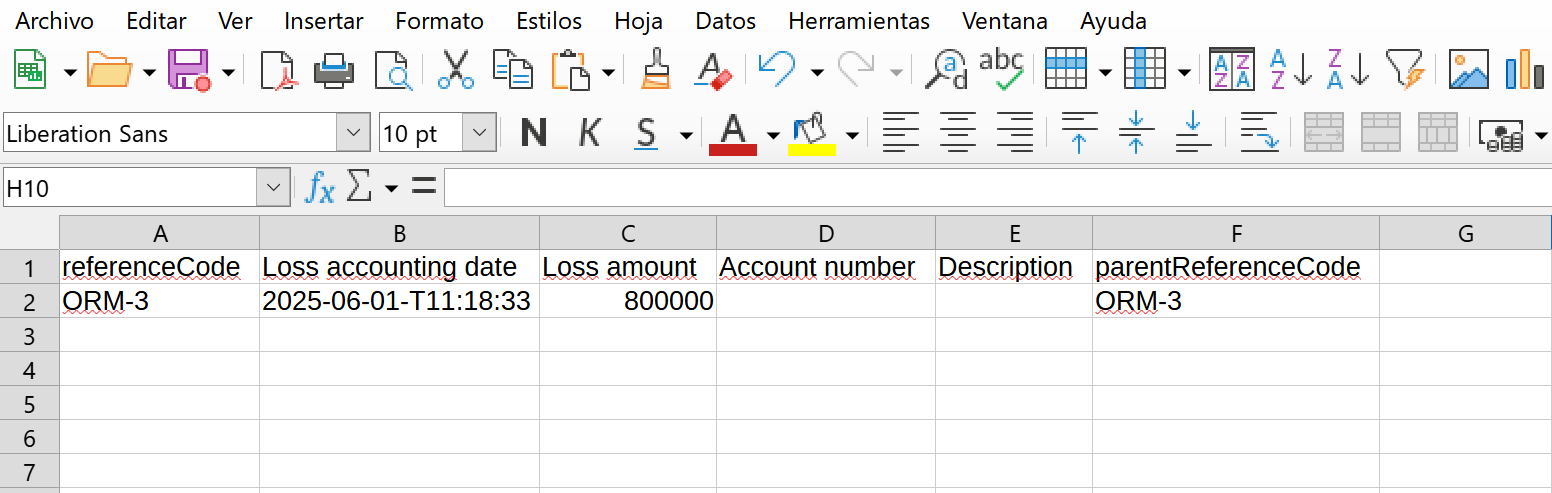
Keep in mind that for a bulk update, it is not necessary to include all the fields of the entity. You can upload only the fields you want to update. However, the following fields are mandatory:
- referenceCode: The unique identifier of the loss.
- parentReferenceCode: The code that links the loss to the main event. This field is mandatory only if you intend to reassign the loss to a different event. Otherwise, you can leave it out.
If your file contains no errors, it will be uploaded successfully, allowing you to proceed to the next step. Otherwise, review the upload file requirements, which you can find in the Help Center.
Once your loss update file is correct and you're ready to proceed without associating additional entities, click “Next” to map the fields from your file.
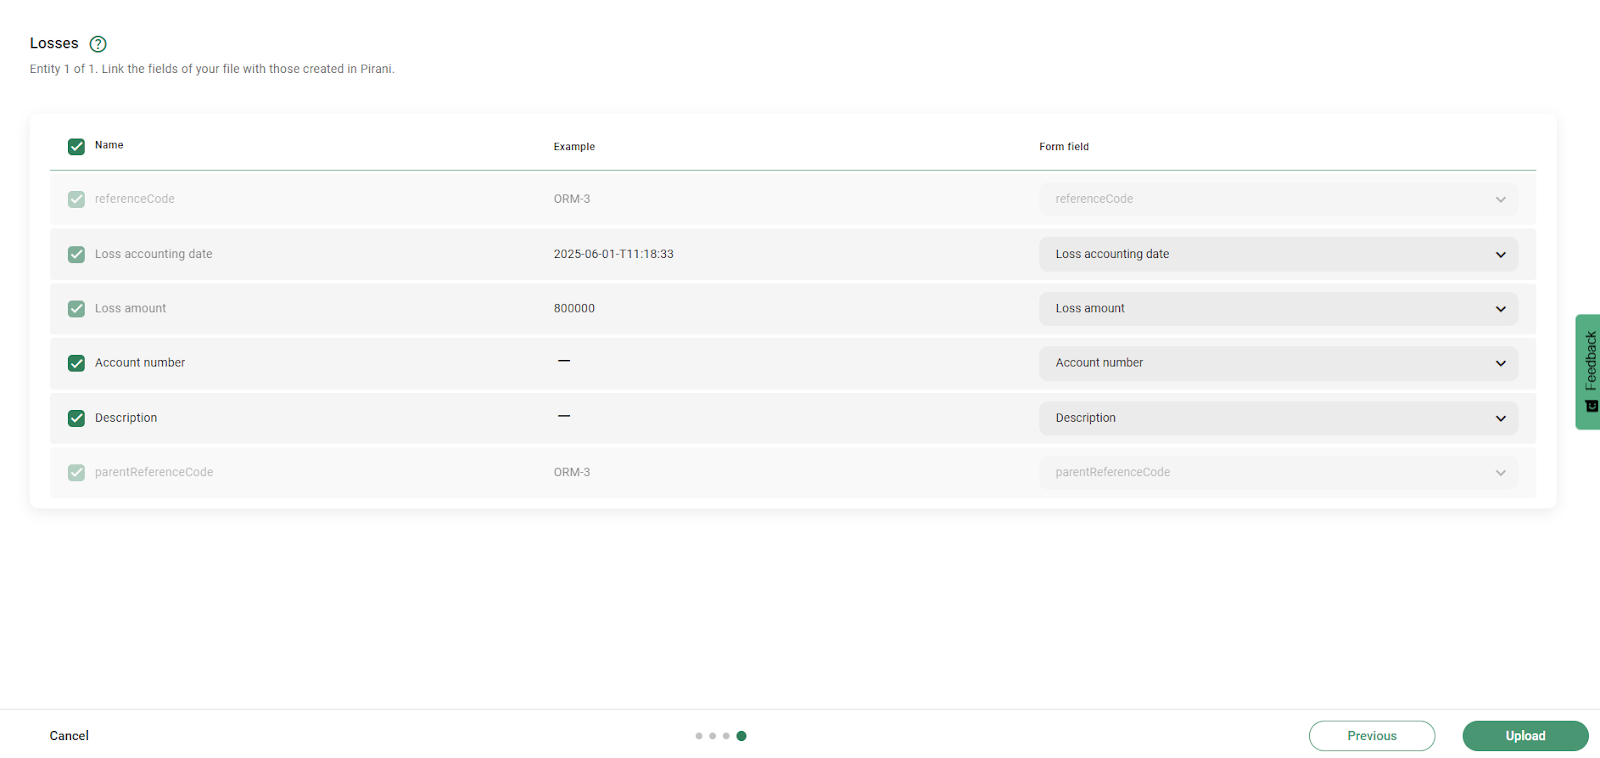
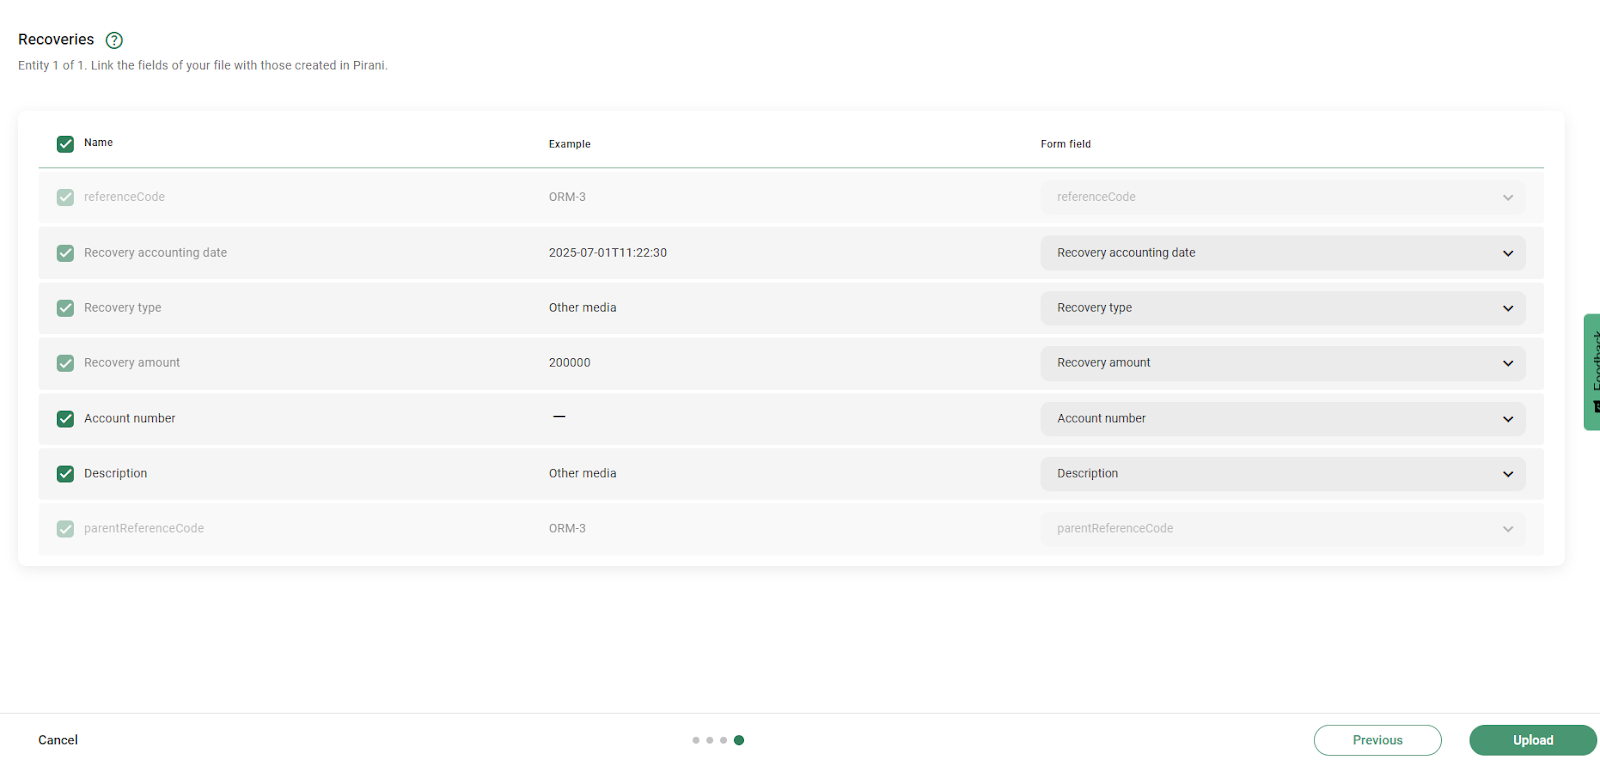
In this step, you’ll need to map the fields from your .csv file to those in the Pirani form.
How to properly map the fields for updating:
- The system will automatically map fields based on the matching column names in your file. If you want to change the mapping, use the dropdown menu in the “Form Field” column to select the correct option.
- If there are columns in your file that you do not want to update in the system, simply uncheck the corresponding box next to the field name. Some fields cannot be unchecked because they are mandatory.
Once you’ve completed the field mapping, click “Upload” to begin the bulk update of the losses.
That's it! The data to be updated will begin to reflect in the corresponding losses of your event.
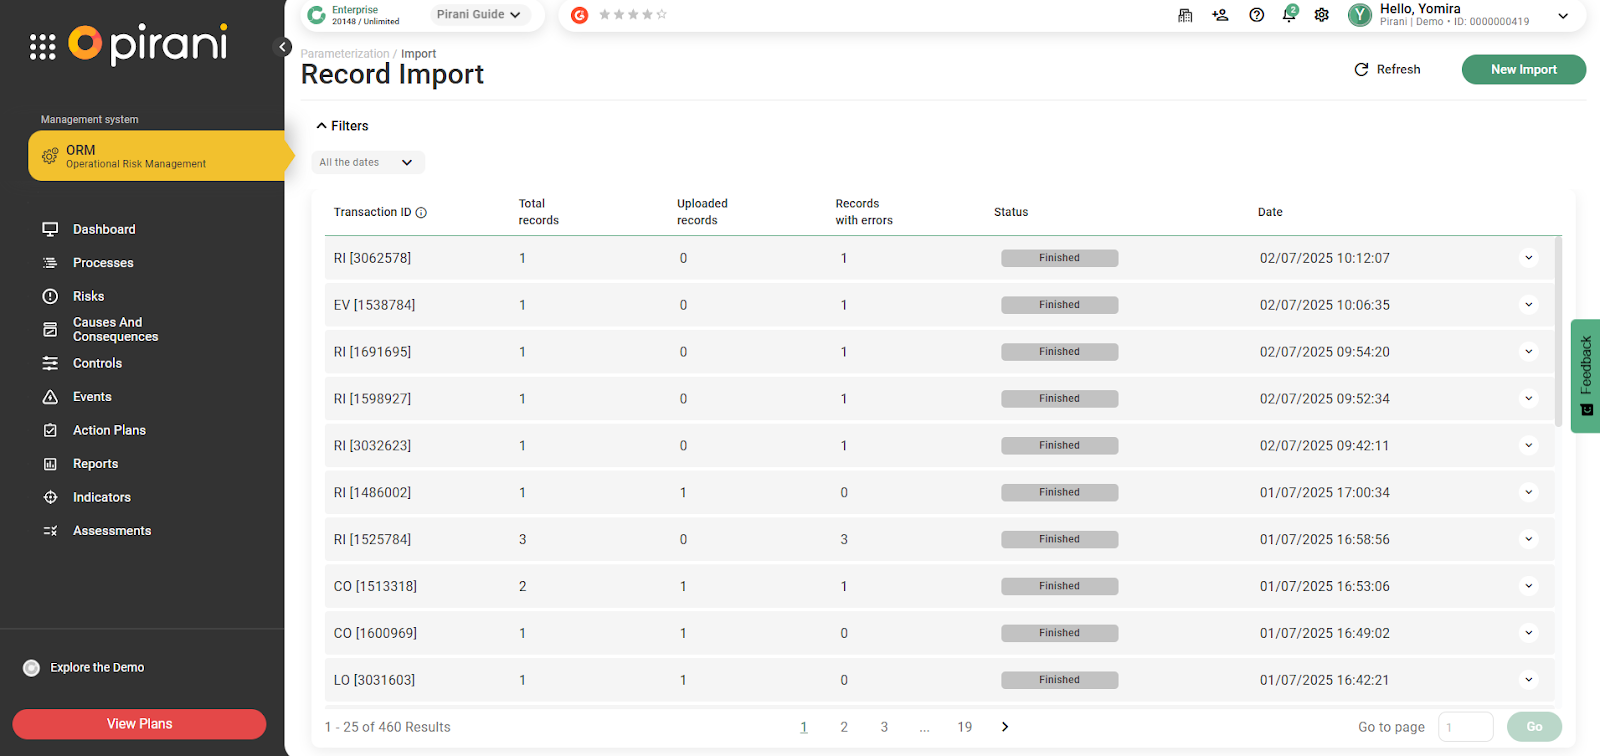
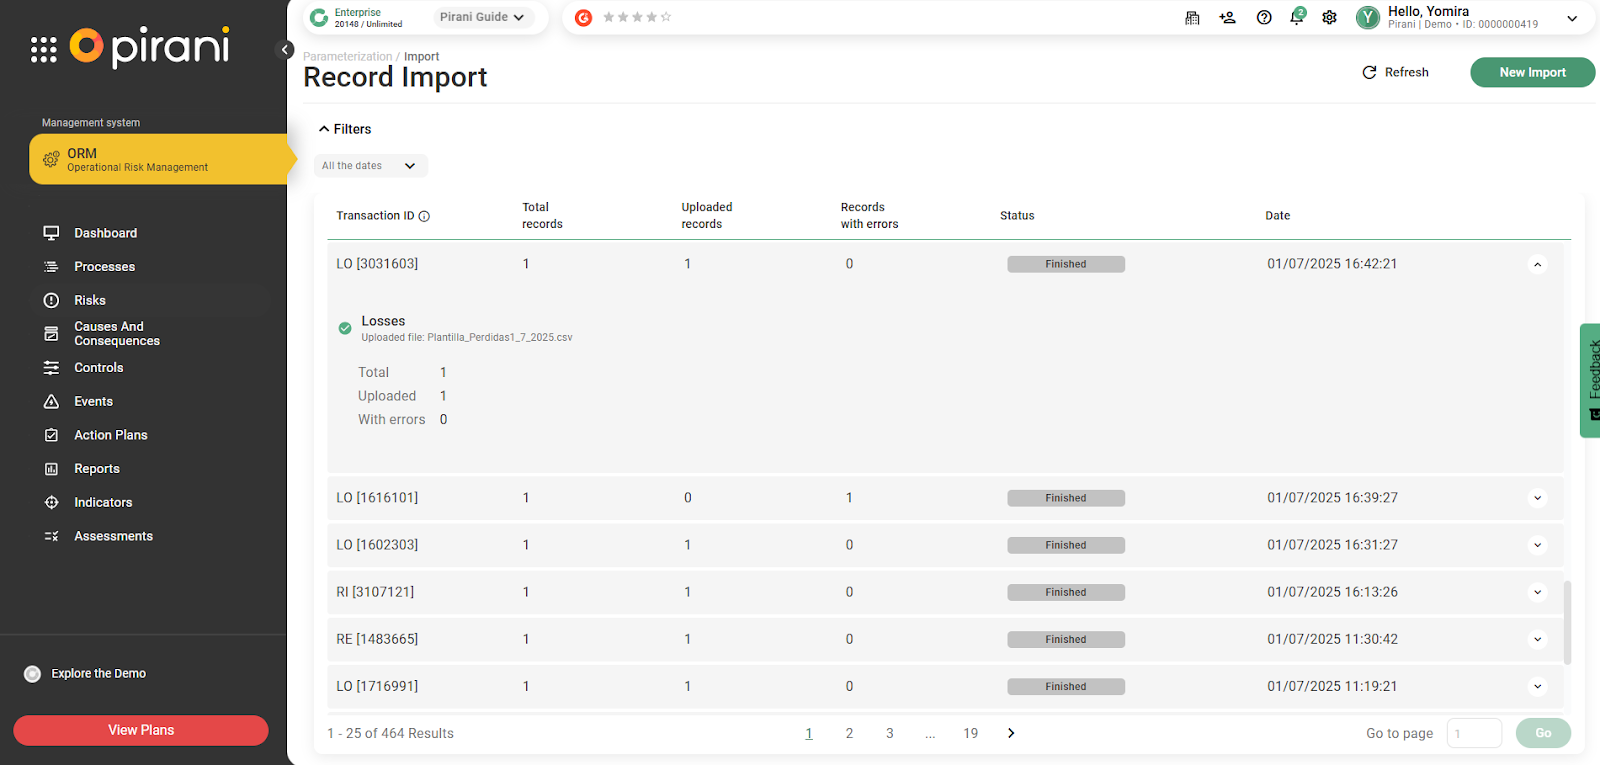
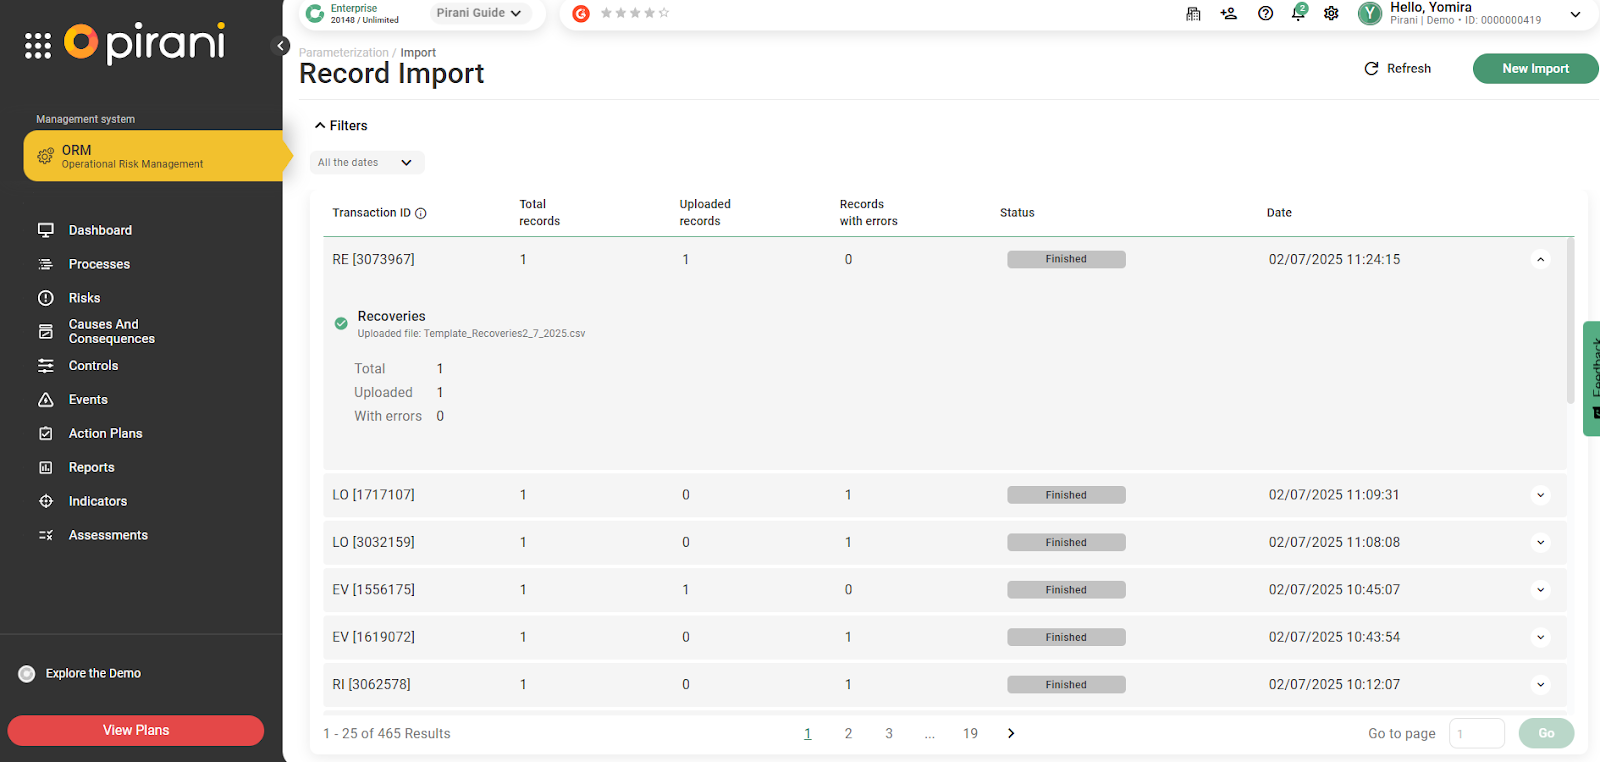
If you want to check the status of your upload, you can expand the details in the Import History. The record you just uploaded will appear at the top of the list.Note:
- This process may take some time, so its status will initially appear as “In progress.” To refresh and check if the process has been completed, click the “Refresh” button.
- The system will automatically map fields based on the matching column names in your file. If you want to change the mapping, use the dropdown menu in the “Form Field” column to select the correct option.
-
- If the status shows “Failed,” you can expand the details to see how many records failed to update. You can also download a .csv file containing the error details. For more information about this file, visit the Bulk Upload section in the Help Center.
How to view the updated information
To verify that the information was successfully updated, follow these steps:
- Go to the Events/Incidents module.
- Select the event you want to review.
- In the left-hand menu, go to the “Losses” section.
- Select the specific loss you want to view. You can locate it using the reference code or the accounting date.
- Check that the loss was updated correctly.
If you have any questions about this process or encounter errors during the upload, please don’t hesitate to contact us by submitting a ticket or sending us a message.
How do I update the recoveries?
To update the “Recoveries” associated with events, go to the dropdown on the right-hand side labeled “What do you want to do with this entity?” and select “Update records from file.”
Once your file is properly structured according to best practices for data import—which you can review in our Help Center—you can upload the Excel file in .csv format.
Keep in mind that for a bulk update, it is not necessary to include all fields of the entity. You can upload only the fields you want to update. However, the following fields are mandatory:
Mandatory fields in the Excel file:
- referenceCode: The unique identifier of the recovery.
- parentReferenceCode: The code that links the recovery to the main event. Since this is an update, this field is optional—only required if you are reassigning the recovery to a different event.
If your file contains no errors, it will be uploaded successfully, allowing you to proceed to the next step. Otherwise, review the file requirements, which you can find in the Help Center.
Once your recovery update file is correct and you are ready to continue without associating additional entities, click “Next” to map the fields from your file.
In this step, you will need to map the fields from your .csv file to the corresponding fields in the Pirani form.
How to correctly map fields for the update:
- The system automatically maps fields based on matching column names in your file. If you want to modify the mapping, you can use the dropdown options available in the “Form Field” column.
- If there are columns you do not want to update in the system, simply uncheck the box next to the field name. Some checkboxes cannot be unchecked because they are mandatory.
When you finish mapping the fields, click “Upload” to start the bulk update of recoveries.
Done! The updated data will start to reflect in the different recoveries associated with your event.
If you want to check the status of your upload, you can expand the details in the Import History; the record you just uploaded will appear at the top.Note:
- This process may take some time, so its status will show as “In progress.” To refresh and check if the process has finished, click the “Refresh” button.
- If the status shows “Failed,” you can expand the details to see how many records failed during the update and download a .csv file with the error details. For more information about this file, visit the Bulk Upload section in the Help Center.
- The system automatically maps fields based on matching column names in your file. If you want to modify the mapping, you can use the dropdown options available in the “Form Field” column.

How do we view the information?
To verify if the information has been updated, follow these steps:
- Navigate to the Events/Incidents module.
- Select the event you want to view.
- In the left-hand menu, go to the “Recoveries” section.
- Select the recovery you want to see. You can locate it by its reference code or accounting date.
- Verify that the recovery has been updated correctly.
If you have any questions about this process or encounter errors during the upload, please don’t hesitate to contact us by submitting a ticket or sending us a message.
Additionally, a new field called “Code” will be added, which will serve as a unique identifier for each loss or recovery.
This applies to both new and existing losses and recoveries.
Now you can do it! Start managing your losses and recoveries today.
Don’t have the Starter plan yet? Schedule a demo! →